How to Create and Install a RapidSSL SSL Certificate on AWS ELB
Updating an SSL certificate on AWS ELB is something I've had to do a few times now (heart bleed, SHA1 deprecation). Each time, I spend more time than I'd like doing what I feel should be a really simple process. RapidSSL does provide documentation on this topic, but it can be hard to follow. If you'd like to try your luck with their instructions, you want to start with their Amazon Web Service (AWS) section. From this page, you will need to jump between a few other documentation pages and piece together a bit of a puzzle. In the interests of saving myself time in the future (and whoever else may read this) I'll attempt to abbreviate and consolidate the entire process here.
Request a certificate from RapidSSL
-
First, go to the RapidSSL signup page and choose your validity details and enter contact information. The first few pages/forms will ask you for some information that is specific to you and your organization. These should be straightforward to fill out.
-
The first technical step you will encounter is generating a certificate signing request (CSR). To do this, I use OpenSSL.
Before you can generate a CSR, you will need a private key. You can create one using OpenSSL using the following command:
1
openssl genrsa -out <private key file name>.key 2048
Substitute any name you want for private key file name (the name doesn't matter). I typically choose a name that is the same as the domain (e.g. example.com.key) that I want to secure.
Next, you will use the private key to generate your CSR with the following command:
1
openssl req -new -sha256 -key <private key file name>.key -out <CSR file name>.csr
Again, you can substitute any name you want for the .csr file and, again, I typically choose the name of my domain (e.g. example.com.csr).
You will be prompted for your organization details. The RapidSSL docs describe how they want you to fill them. You will need:
- country code (CA in my case for Canada)
- State or Province Name (spell this out fully, no abbreviations)
- Locality Name (your city)
- company/organization name (whatever your organization's name is)
- organizational unit skip (hit enter)
- common name (use
host + domain namee.g. site.example.com, example.com). - Email Address skip
- challenge password skip
- optional company name skip
If you want, you can verify your CSR with the following command:
1
openssl req -noout -text -in <CSR file name>.csr
-
Submit CSR to RapidSSL
Simply copy/paste the contents of
<CSR file name>.csrinto the Certificate Signing Request textarea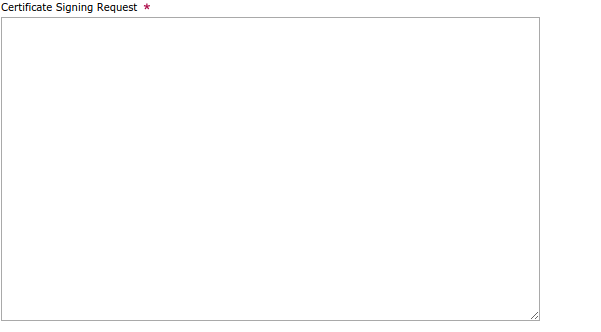
After copying the CSR, hit Continue. The next few pages will ask you to confirm your request details and pay. You should then receive receive e-mails that confirm your order and provide you with instructions for validating your request. When you successfully validate your request, you will receive your new public certificate and the intermediate certificate via a final e-mail.
Once you have verified the request, you should receive a final e-mail that provides you with:
- Your "Web Server" (i.e. public) certificate
- An intermediate certificate
You will need both of these for installation on AWS.
Installing your new certificate on an AWS ELB
Warning: If this is your first time, I would recommend using a "staging" ELB instance to try this process out. The following steps combine uploading your new certificate and switching your ELB to using it in one atomic operation. I wish there was a separate process specifically for uploading/managing AWS SSL certificates for ELB, but I can't seem to find one. Consider yourself warned - if you make a mistake, you may end up serving an invalid certificate.
-
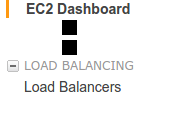
Go to the EC2 Console and navigate to Load Balancers.
-
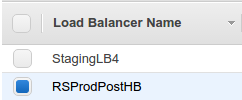
From the list of load balancers that appear, select the load balancer instance that you want to install the new certificate on.
-
Select the Listeners tab and click the Change link (under the SSL Certificate) column.
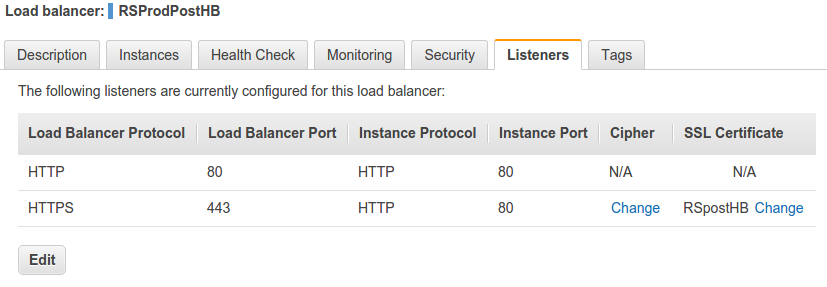
- Next to Certificate Type, choose the Upload a new SSL certificate to AWS Identity and Access Management (IAM) option.
- Enter your certificate details:
- Enter a certificate name. This can be anything, choose something that will help you remember which certificate this is. I haven't yet found a way to get rid of old certificates, so choose a name that will help you a few years down the line when you have repeated this process a few times and have installed several certificates for the same domain.
- Copy the contents of
<private key file name>.keyinto the Private Key field - Copy the contents of the "Web Server" certificate into the Public Key Certificate field (this should be in the RapidSSL e-mail)
- Copy the contents of the intermediate certificate into the Certificate Chain field (this should also be in the RapidSSL e-mail)
- Hit Save.
- Navigate to an SSL URL that is served by your ELB instance and verify that the new SSL certificate is accepted by your browser.
Your ELB instance should now be serving requests using this SSL certificate.